고정 헤더 영역
상세 컨텐츠
본문
. Details Created: Monday, 20 September 2004 12:43 Written by Salton-Maxim Co.
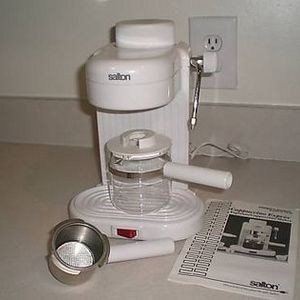
Directions for Making Espresso Coffee Guide for photo at right. 1.) Cap for Steam boiler. 2.) Steam valve. 3.) Portafilter (coffee holder). 4.) Steam Wand.
5.) Espresso coffee carafe. 6.) Power Switch Step 1: a) Make sure switch is in OFF position. B) Remove water reservoir cap. C) Fill carafe with two to four cups of cold water using the markings on the carafe for reference. Pour into water reservoir. D) Important: When making cappuccino, add extra water to steam level shown on the carafe for two cups and to the bottom of the metal band for four cups.
E) Close cap tightly. DO NOT OPEN RESERVOIR CAP DURING THE BREWING PROCESS. SCALDING MAY OCCUR IF THE CAP IS REMOVED DURING THE BREWING CYCLE. Step 2: a) Fill filter basket with desired amount of coffee. Lines in filter basket indicate coffee level for two or four cups. Use the measuring scoop for easy filling. Do not tamp coffee.
Be sure to use a fine drip grind coffee. B) Place filter basket into filter holder.
C) Insert holder by placing handle over the left side of the ON/OFF switch. Push it upward so it will be aligned with matching slots. Turn handle to the right until securely locked. DO NOT REMOVE FILTER HOLDER DURING THE BREWING PROCESS - SCALDING MAY OCCUR. D) Place cover on carafe and set it on drip tray.
E) Steam jet control knob must be in closed (clockwise) position. Step 3: a) Push switch to ON. Switch is illuminated. B) In about four minutes, the espresso will start to flow into the carafe. Important: For cappuccino, refer immediately to the next 2 sections. For espresso, continue with next step.
C) When coffee has stopped flowing, turn switch to OFF position. D) Before removing reservoir cap, open the steam jet control knob (counter-clockwise) 1/2 turn to relieve any pressure. To Prepare Cappuccino Step 4: Use 2 or 4 cappuccino cups or glasses. Fill each individual cup about half-way with cold milk. Follow Step 1 through Step 3b.

Salton Cappuccino Machine
Step 5: Line up milk-filled cups next to the machine. When the coffee starts to flow into the carafe, begin frothing each cup as follows: a) Hold cup by handle and bring up to the steam jet. B) Insert jet just under the surface of the milk. C) Open steam control knob with free hand by turning counterclockwise one or two turns. D) Move cup in a circular motion and allow steam to froth the milk for several seconds. E) After frothing, insert steam jet to bottom of cup for just 2 to 3 seconds to warm milk.
Remember-cold skim milk froths more readily Over-heating milk will break down the bubbles. F) After removing steam jet from frothed milk turn steam control knob to OPEN momentarily to clear the iet of milk. G) When coffee has stopped flowing into carafe, turn switch to OFF position.
H) Holding covered carafe, gently pour an equal amount of espresso alongthe side of the cup. Don't pour espresso into the middle of the cup as this will break down the froth. I ) Top each cup of cappuccino with a dash of nutmeg, cinnamon or chocolate shavings. Another Way to Froth Milk Pour desired amount of milk into a small pitcher or mug-approximately 4 to 6 oz. For 4 cups of cappuccino or 3 oz. Milk for two cups of cappuccino. Follow cappuccino preparation instructions to froth milk.
Serve the hot, frothy milk by spooning it on top of your cup of espresso. The froth will not readily pour from container, since it separates from the heated milk. Suggestions and Hints 1. If you cannot generate sufficient steam pressure to froth milk, you may be using too coarse a grind of coffee. Try tamping lightly. If you run out of steam and milk is not foamy, you probably did not begin frothing the milk early enough in the brewing cycle.
3.If less than the full amount of coffee flows into the carafe and you run out of steam, you probably steamed the milk too long. If steam jet hole clogs, allow machine to cool, and insert a pinto unplug.

Do not use a toothpick. If coffee flows very slowly, you maybe using too fine a grind or tamping too hard. The glass carafe must never be used on a range top.
Do not set hot carafe onto a wet or cold surface. Do not use carafe if cracked. If you add liqueur, do so before adding milk. The short power supply cord is provided to reduce risks resulting from becoming entangled in or tripping over a longer cord.
Extension cords may be used if care is exercised in their use. If an extension cord is used: (a) The electrical rating of the extension cord should be at least that of the appliance.
(b) The longer cord should be arranged so that it will not drape over the counter top or table top where it can be pulled.


